Table of Contents:
In In Control Mod 1.16.5/1.15.2, players have the power to control mob spawning in Minecraft! In this mod, there are two different rule files that can be used: one for blocking spawns of certain mobs under certain conditions and another for adding new spawn points to the world map In In Control Mod 1.16.5/1.15.2 also features a comprehensive list of options which allow you to alter stats on mobs such as giving them more health or making them angry In In Control Mod 1.16.5/1.15., there is no limit to what you can do with this mod!

How to install Download In Control Mod for Minecraft?
Follows 5 Steps below to install Download In Control Mod for Minecraft on Windows and Mac :
1. Download and install Minecraft Forge, you can read the instructions below the article.
2. Download the In Control Mod for Minecraft.
3. Open the . minecraft folder and then enter the mods folder. Important: Some older versions of Forge may not have the ‘Open Mods Folder’ button. If this is the case, create the directory under the name mods.
Windows:
Press the Windows key +R at the same time
Type %appdata% and press enter
Find folder Minecraft and then look for the Mods folder within that
Mac:
Click on the desktop and then press Command+Shift+G all at the same time
Type ~/Library and press enter
Open the folder Application Support and then Minecraft.
4. From here, drag in the mods file downloaded (.jar or .zip) you wish to add.
5. Run Minecraft, and you should now see the new mod installed in the list!
Enjoy Download In Control for Minecraft, If there is an error, please comment on this article we will support.
Features:
There are currently five rule files (as of 3.5.1):
- spawn.json: with this file you can block spawning of certain creatures under certain conditions. In addition, when a spawn is allowed you can also alter some of the properties of the mob like maximum health and others
- summonaid.json: this is a file that is structured the same as spawn.json but is only used when zombies are summoned for aid
- potentialspawn.json: with this file you can remove and add spawn rules under certain conditions. The rules in this file are used before the rules in spawn.json are fired so make sure that when you add a rule for new mobs here, the new mobs are allowed in spawn.json
- loot.json: with this file you can control the loot that mobs drop when they are killed based on various criteria
- experience.json: with this file you can control how much experience you get from killing mobs based on various criteria
Item Filter Examples
The following examples are all applied on playerhelditem but it is of course possible to use them for any kind of condition that supports items.
The simplest case. A simple stick:
"playerhelditem": "minecraft:stick",
A list of different items:
"playerhelditem": [ "minecraft:stone_pickaxe", "minecraft:stone_axe", "minecraft:stone_shovel", "minecraft:stone_sword" ],
A specific block with a specific metadata:
"playerhelditem": "minecraft:[email protected]",
The same example specified with JSon:
"playerhelditem": { "item": "minecraft:stained_hardened_clay", "damage": 13 },
The same block with some NBT data:
"playerhelditem": "minecraft:[email protected]/{display:{Lore:[\"My Clay\"]}}",
The same example specified with JSon:
"playerhelditem": { "item": "minecraft:stained_hardened_clay", "damage": 13, "nbt": [ { "tag": "display", "value": "My Clay" } ] },
An empty hand:
"playerhelditem": { "empty": true },
In this example we need a damage pickaxe:
"playerhelditem": { "item": "minecraft:iron_pickaxe", "damage": ">0" },
In this final example we test if a pickaxe has a specific enchantment (unbreaking in this case):
"playerhelditem": { "item": "minecraft:iron_pickaxe", "nbt": [ { "tag": "ench", "contains": [ { "tag": "id", "value": 34 } ] } ] },
Block Filters
Similarly to item filters there is also the block condition that can test on the existance of a specific block. Like with items it is possible to specify a list or a single block filter. Here are the possibilities on an individual block filter:
- minecraft:sand: a block matching this id. Metadata and/or properties are ignored
- ore:dyeBlue: a block matching the specified ore dictionary value
- A Json descriptor which supports the following tags:
- block: a block ID (like minecraft:sand or rftools:powercell)
- properties: (only if block is used). This is a JSon array with properties to match against. As soon as this is present a blockstate will be constructed made out of the block and the properties specified here and the match has to be exact. So properties that are not specified here will be put to their default value
- ore: a string indicating an ore dictionary value (for example ingotCopper, dyeBlue, plankWood, …)
- mod: a string indicating the modid for the block
- energy: an expression which will be evaluated to the amount of Forge Energy present in the block
- contains: either a single JSon object or else an array of JSon objects representing item filters as explained in the item filter section. The contains test will succeed if it finds any matching item in the inventory (if the block to test actually represents an inventory)
- side: this is a modifier for both energy and contains. If present it will indicate the side from which we want to examine the energy or inventory contents. If not present the ‘null’ side is used. This should be a string like east, west, south, north, up, or down.
Block Filter Examples
A diamond block:
"block": "minecraft:diamond_block",
A block of planks:
"block": "ore:plankWood",
Or in JSon syntax:
"block": { "ore": "plankWood" },
An RFTools powercell containing more then 1000000 energy:
"block": { "block": "rftools:powercell", "energy": ">1000000" },
A chest containing more then 10 sticks:
"block": { "block": "minecraft:chest", "contains": { "item": "minecraft:stick", "count": ">10" } },
A powered button:
"block": { "block": "minecraft:stone_button", "properties": [ { "name": "powered", "value": "true" } ] },
Mob Counter
The ‘maxcount’ and ‘mincount’ tags to control mob spawning can be either a simple number or string containing a number and a mob but it can also be a more complex json with various conditions. The following tags are supported:
- amount: the amount to compare with (can be scaled!)
- perplayer: if this is true the amount will be scaled with the amount of players present
- perchunk: if this is true the amount will be scaled with the amount of loaded chunks divided by 289 (this is how vanilla mobcap works)
- mod: if this is set all mobs of a given mod are counted (can be used in combination with hostile or passive)
- hostile: if this is set all hostile mobs are counted
- passive: if this is set all passive mobs are counted
- mob: this is a single mob or a list of mobs. If this is present only those mobs are counted
Mob Counter Examples
In spawn.json: deny skeletons if there are already more then 50 hostile vanilla mobs present per player:
{ "dimension": "minecraft:overworld", "mob": "minecraft:skeleton", "mincount": { "amount": 50, "hostile": true, "perplayer": true }, "result": "deny" }
In spawn.json: deny all mobs of a given mod if there are already more then 50 mods of that mod present, scaled based on vanilla mob cap rules:
{ "dimension": "minecraft:overworld", "mod": "horriblecreatures", "mincount": { "amount": 50, "mod": "horriblecreatures", "perchunk": true }, "result": "deny" }
Contrast above example with the old syntax where it would compare the amount of each individual mob of the given mod:
{ "dimension": "minecraft:overworld", "mod": "horriblecreatures", "mincount": 50, "result": "deny" }
Conditions
In this section all possible conditions are explained. Some conditions are not usable in all rules. This will be mentioned here. Whenever a position is tested in a rule the given position depends on the rule. For mob spawns this will be the position where the mob will spawn. For block break events this will be the position of the broken block. For player effects this is the position of the block on which the player is standing.
Possible types:
* S: a string
* B: a boolean (true/false)
* I: an integer
* F: floating point number
* [<type>]: a list of type (for example, [S] is a list of strings)
* JSON: a json in a specific format explained elsewhere
In Control Mod Screenshots:
In Control 1.16.5/1.15.2 Download Links:
Minecraft Game version 1.11.2/1.10.2:![]()
Minecraft Game version 1.12.1/1.12:![]()
Minecraft Game version 1.12.2:![]()
Minecraft Game version 1.15.2:![]()
Minecraft Game version 1.16.3:![]()
Minecraft Game version 1.16.4:![]()
Minecraft Game version 1.16.5:![]()
How To Download and Install Minecraft Forge (Modding API)?
Minecraft Forge is a free, open-source server that allows players to install and run Minecraft mods. 4 steps to install forge for windows, mac, Linux
1. Download Minecraft Forge at the website, select the version of Minecraft you want to run, then download the installer using your browser.
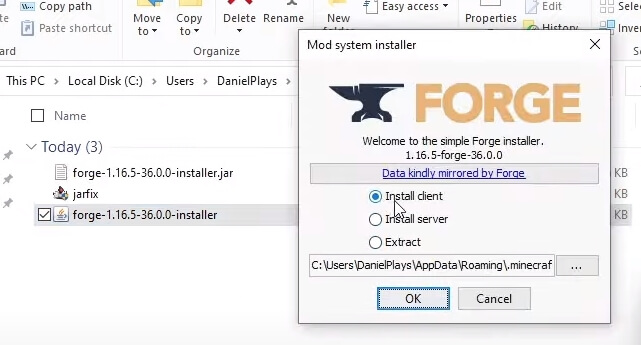
2. Open the .jar file you just downloaded (Run installer as Administrator), make sure Java is installed on your operating system
3. Select Install Client or Install Server if you want to install for your server, and click OK. Wait about 2 minutes, and you will see a success message.

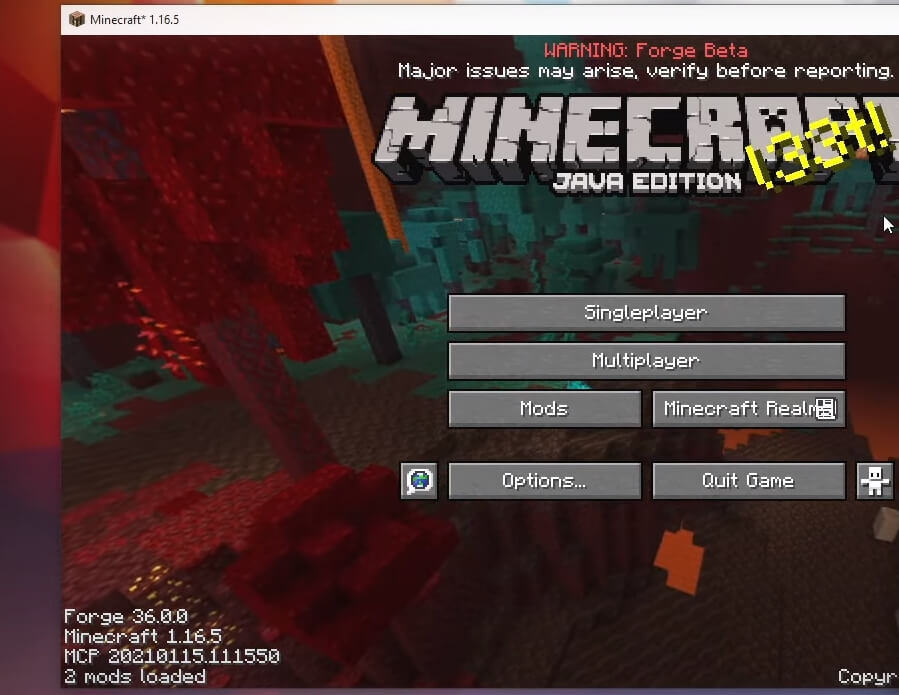
4. Launch Minecraft and select the Forge profile, then click Play.
5. You will see Minecraft Forge in the lower-left corner and the Mods button under Multiplayer.

Congratulations on successfully installing Minecraft Forge and experimenting with In Control Mod for Minecraft downloaded.
If there are errors, please comment on this article.
Click to rate this mod!

